New - 5 Hours Ago

.jpg)


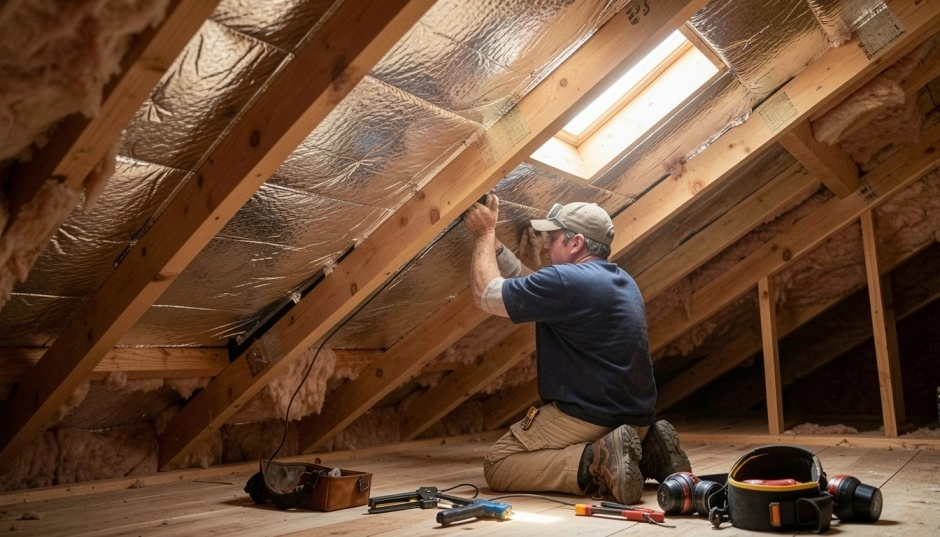
A Front Range attic can reach 140 to 160 degrees on a July afternoon even though the outside air sits in the 90s and the night before dropped into the 50s. Radiant barrier foil is one of the more affordable ways to bring that number down before the hottest stretch of a Colorado summer arrives, and it works alongside insulation you already have rather than replacing it.
Roughly 300 days of sun a year and thinner air at altitude mean more direct solar radiation hits a Front Range roof than a roof at sea level under the same outside air temperature. That radiant heat passes through the roof deck and into the attic space, where it radiates down toward the insulation and the ceiling below, independent of how cool the night air was.
Radiant barrier foil is a reflective material, commonly aluminum-faced, installed under the roof deck or across the rafters. Instead of absorbing the sun's radiant heat the way a dark shingle or plywood deck does, the foil reflects a large share of it back out before it ever enters the attic air. It addresses radiant heat specifically, which is a different mechanism than the conductive heat that bulk insulation slows down.
Installers commonly report attic temperature drops of 20 to 30 degrees on a sunny Colorado afternoon once foil is in place, though the exact number depends on roof color, existing ventilation and insulation depth. A lower attic temperature means less heat working its way down into living space and less load on any air conditioning or evaporative cooling system.
Yes. Foil addresses radiant heat transfer while blown-in or batt insulation addresses conductive heat transfer, so the two work together rather than duplicating each other. A homeowner with older, thin attic insulation gets more benefit from adding both than from either one alone.
Material for a typical Front Range attic runs a few hundred dollars for a do-it-yourself roll installation; a professional install with labor for a 1,500 to 2,500 square foot attic commonly runs $1,500 to $3,500 depending on roof complexity and access. Owners can view available radiant barrier products to compare roll widths and coverage before pricing a job; you are free to use any installer or supplier.
A stapled or draped foil installation across open rafters is within reach for an owner comfortable working in a hot attic space with basic tools, a weekend project for an average Denver metro attic. A foil product installed directly against the roof deck, rather than draped over the insulation, needs an airspace on the reflective side to perform correctly, so read the manufacturer's installation instructions before starting.
Xcel Energy runs seasonal rebate programs for attic insulation and air sealing in its Colorado service territory; radiant barrier foil itself is not always a listed rebate category, so check the current program catalog and confirm whether the specific product and installer qualify before you count on a rebate offsetting the cost.
Higher UV intensity at altitude breaks down asphalt shingles and exposed foil products faster than the same materials would degrade at sea level. A radiant barrier installed under the roof deck, out of direct UV exposure, holds up longer than one left exposed, which is one reason most installations go under the deck or across the rafters rather than on top of existing insulation facing up toward a roof vent.
Current energy code guidance for Front Range climate zones calls for attic insulation in the R-49 to R-60 range, higher than many homes built before 2000 actually have. A quick way to check: if you can see the tops of the ceiling joists above the insulation, the attic is under-insulated for a Colorado winter and summer both.
If the attic insulation is already at or near current code depth, radiant barrier foil is the next upgrade with the clearest summer benefit. If the insulation is thin or uneven, bringing it up to depth first addresses both winter heat loss and summer heat gain, and foil can be added afterward for the additional radiant heat reduction.
A hot attic radiates heat down through the ceiling into living space all afternoon and evening, forcing an air conditioner to run longer cycles or a swamp cooler to work harder to keep pace. Lowering attic temperature by 20 to 30 degrees reduces that heat gain and shortens cooling run time on the hottest Front Range days.
Hail season on the Front Range runs from spring through September, and a roof replacement after storm damage is a natural time to add radiant barrier foil under the new deck or rafters while the roof is already open, since labor to access the attic space is already part of the job in most cases.
Ventilation, insulation and radiant barrier each solve a different part of the attic heat problem, and skipping one limits what the others can do. Blocked soffit vents or an undersized ridge vent trap hot air in the attic regardless of how much insulation or foil is installed, so check airflow before adding more material.
A buyer's inspector checks attic insulation depth and ventilation as a standard part of a Colorado home inspection, and a well-documented, properly insulated attic is one less item that shows up as a negotiating point during the inspection objection period. The preparing and adding value before selling guide covers which attic and energy upgrades buyers notice first.
Radiant barrier foil is installed inside the attic, under the roof deck or across the rafters, and reflects heat before it fully enters the living space; a reflective roof coating is applied to the outside surface of the roof itself and reduces how much heat the roofing material absorbs in the first place. The two can be used together, though most Front Range homes see the larger benefit from the interior foil relative to its cost.
A seller getting ready for a spring or summer listing commonly bundles attic work with a furnace tune-up, a duct inspection and an Xcel Energy rebate check into one pre-listing pass, since a buyer's inspector and a buyer's own utility bill research both touch on the same systems. Doing the attic work first, while the roof and access panel are already easy to reach before hail season repairs pile up, keeps the rest of that checklist simpler.
The Kenna Real Estate Group points Front Range owners and buyers toward the attic and energy upgrades that actually show up at resale, not just the ones that sound good. Call or text 303-955-4220. A live person answers. Not a robot, not a phone tree. Ready to see what is on the market right now? Search every home for sale in Colorado.
Questions about any home in Colorado? Call or text 303-955-4220. A live person answers.
A Front Range attic can reach 140 to 160 degrees on a sunny July afternoon, driven by direct solar radiation at altitude.
No, it addresses radiant heat transfer while insulation addresses conductive heat transfer. Most Colorado attics benefit from both.
$1,500 to $3,500 for a 1,500 to 2,500 square foot Front Range attic, depending on roof complexity and access.
A stapled or draped installation across open rafters is within reach for an owner comfortable working in a hot attic; a deck-mounted install needs a correct airspace per the manufacturer's instructions.
Current code guidance for Front Range climate zones calls for R-49 to R-60, higher than many pre-2000 homes have installed.
Xcel Energy rebates attic insulation and air sealing programs; check the current catalog to confirm whether a specific radiant barrier product and installer qualify.
A buyer's inspector checks attic insulation and ventilation as a standard part of a Colorado home inspection, so a well-prepped attic removes one negotiating point.